OAuth setup
OAuth credentials
OAuth lets API tools authenticate with external services without putting secrets in prompts. Use the narrowest scopes and test the credential before using it in a live workflow.
A good OAuth setup is authorized, scoped, tested, and easy to revoke.
OAuth 2.0 credentials enable your API tools to authenticate with external services. Nuvoca supports two OAuth grant types for different use cases.
Supported Grant Types
Nuvoca supports two OAuth 2.0 grant types:
| Grant Type | Use Case | User Interaction | Example Services |
|---|---|---|---|
| Client Credentials | Server-to-server authentication | None | Stripe API, Twilio API |
| Authorization Code + PKCE | User authorization with data access | Required (one-time) | Google Calendar, Microsoft Graph, GitHub |
When to Use Each Grant Type
- Client Credentials: Use when accessing your own service account data or APIs that don't require user consent
- Authorization Code + PKCE: Use when accessing user data from services like Google, Microsoft, or GitHub that require user authorization
How OAuth Works in Nuvoca
Client Credentials Flow
sequenceDiagram
    participant Agent as Voice Agent
    participant Platform as Nuvoca Platform
    participant API as External API

    Agent->>Platform: Execute API tool with OAuth
    Platform->>API: Request access token (client credentials)
    API-->>Platform: Return access token
    Platform->>API: API call with Bearer token
    API-->>Platform: Return data
    Platform-->>Agent: Return response
The Process:
1. Configuration: Store OAuth client credentials in Settings → Credentials
2. Token Request: Platform requests access token using client ID and secret
3. Caching: Access token is cached for its lifetime (5 minutes default)
4. API Call: Platform makes API requests with Authorization: Bearer <token> header
5. Automatic Refresh: New token fetched when cached token expires
Authorization Code + PKCE Flow
sequenceDiagram
    participant User as User
    participant Platform as Nuvoca Platform
    participant Provider as OAuth Provider<br/>(e.g., Google)
    participant Agent as Voice Agent

    User->>Platform: Click "Authorize" button
    Platform->>Platform: Generate PKCE code verifier/challenge
    Platform->>Provider: Open authorization popup with code challenge
    Provider->>User: Show consent screen
    User->>Provider: Grant permissions
    Provider->>Platform: Redirect with authorization code
    Platform->>Provider: Exchange code for tokens (with code verifier)
    Provider-->>Platform: Return access + refresh tokens
    Platform->>Platform: Store refresh token (encrypted), cache access token

    Note over Agent,Platform: Later - Agent uses API tool
    Agent->>Platform: Execute API tool with OAuth
    Platform->>Provider: API call with cached access token
    Provider-->>Platform: Return data
    Platform-->>Agent: Return response

    Note over Platform,Provider: When access token expires
    Platform->>Provider: Refresh access token using refresh token
    Provider-->>Platform: Return new access token
The Process: 1. Configuration: Create OAuth config with authorization URL and redirect URI 2. Authorization: Click "Authorize" button, opens popup to OAuth provider 3. User Consent: Grant permissions on provider's consent screen 4. Token Exchange: Platform exchanges authorization code for access + refresh tokens 5. Storage: Refresh token is encrypted and stored in database, access token cached 6. API Calls: Agents use the cached access token for API requests 7. Auto Refresh: When access token expires, platform uses refresh token to get a new one 8. Re-authorization: If refresh token expires, you must re-authorize
Setting Up OAuth Credentials
Step 1: Navigate to Credentials Settings
From your dashboard, navigate to: - Settings → Credentials
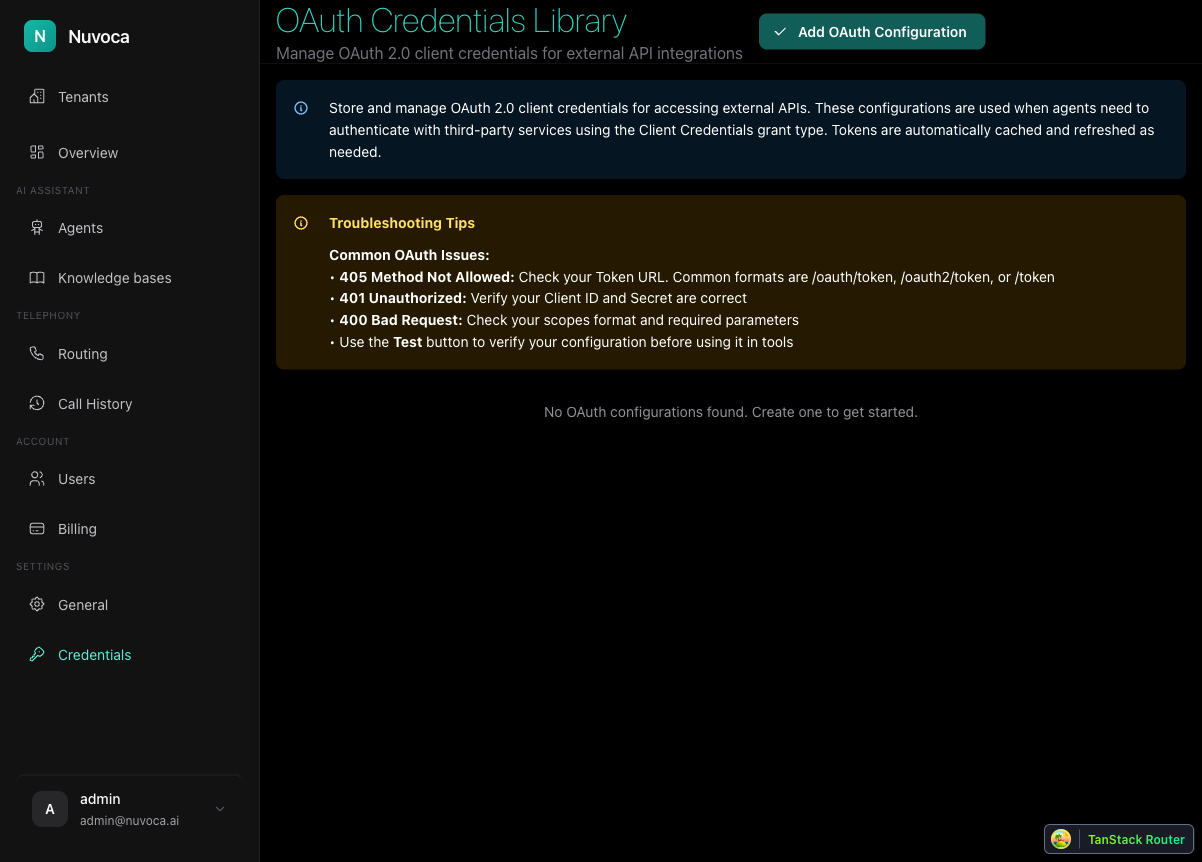
This page shows all configured OAuth credentials for your tenant.
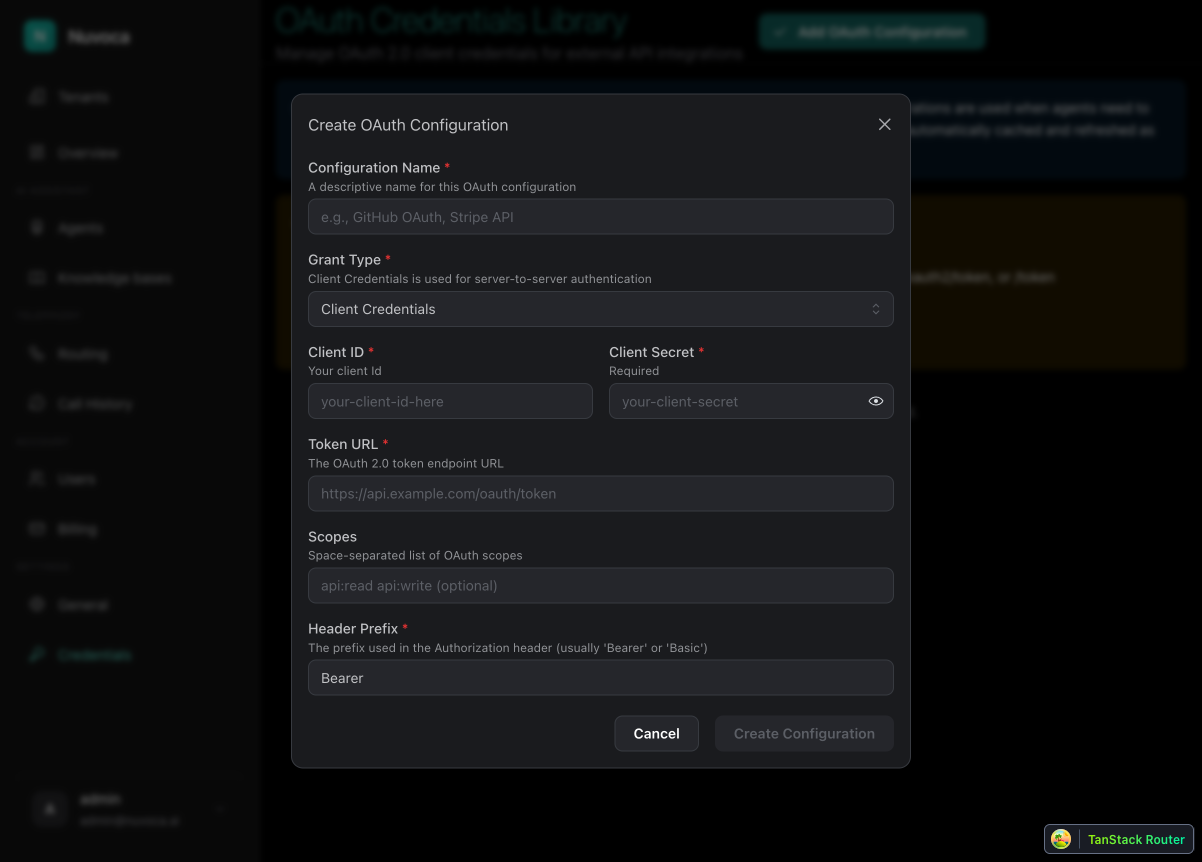
Step 2: Add OAuth Configuration
Click "Add OAuth Configuration" to open the configuration dialog.
Step 3: Choose Grant Type
First, select the appropriate grant type for your use case:
| Setting | Description |
|---|---|
| Grant Type | Choose "Client Credentials" for server-to-server, or "Authorization Code (PKCE)" for user data access |
Step 4: Configure Common Settings
Fill in these settings for both grant types:
| Field | Description | Example |
|---|---|---|
| Configuration Name | Display name for this OAuth credential | "Google Calendar API" |
| Client ID | OAuth client identifier from your provider | your-app.apps.googleusercontent.com |
| Token URL | OAuth token endpoint URL | https://oauth2.googleapis.com/token |
| Scopes | Space-separated list of permissions | https://www.googleapis.com/auth/calendar.readonly |
| Header Prefix | Authorization header prefix (usually "Bearer") | Bearer |
Step 5: Configure Grant-Type Specific Settings
For Client Credentials
| Field | Description | Example |
|---|---|---|
| Client Secret | OAuth client secret (required) | GOCSPX-abc123xyz... |
For Authorization Code + PKCE
| Field | Description | Example |
|---|---|---|
| Client Secret | Optional for PKCE, but some providers require it | (leave blank for most PKCE flows) |
| Authorization URL | OAuth authorization endpoint URL | https://accounts.google.com/o/oauth2/v2/auth |
| Redirect URI | Must match redirect URI registered with your provider | https://your-platform.com/oauth/callback |
PKCE Client Secret
For pure PKCE flows (recommended), the client secret is optional. However, some providers like Google recommend using it for additional security in confidential client scenarios. Check your provider's documentation.
Complete Example: Google Calendar API (PKCE)
For Google Calendar, we must use Authorization Code + PKCE because: - Google requires user consent for accessing calendar data - Google doesn't support Client Credentials for user data access
Step 1: Create Google Cloud Project
- Go to Google Cloud Console
- Create a new project or select an existing one
- Navigate to APIs & Services → Library
- Search for "Google Calendar API" and click Enable
Step 2: Create OAuth Credentials
- Navigate to APIs & Services → Credentials
- Click Create Credentials → OAuth client ID
- Application type: Select Web application
- Name: Enter "Nuvoca Integration"
-
Authorized redirect URIs: Add your platform's callback URL:
!!! warning "Redirect URI Must Match" The redirect URI here must match exactly what you configure in Nuvoca later. Include the protocol (https), domain, and path. -
Click Create
Step 3: Copy Your Credentials
Note the following from the credentials page:
- Client ID: your-app.apps.googleusercontent.com
- Client Secret: GOCSPX-abc123xyz... (optional for PKCE but recommended)
Step 4: Configure in Nuvoca
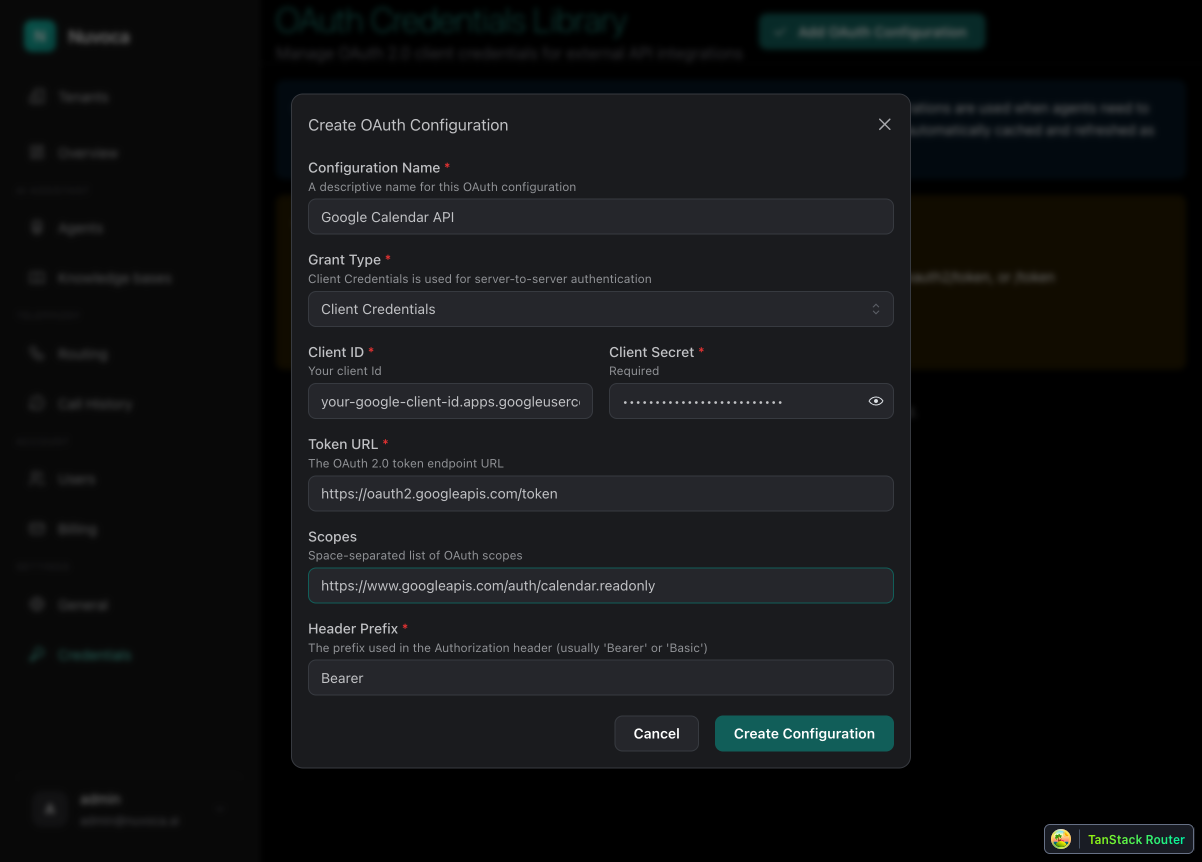
Create a new OAuth configuration with these settings:
| Field | Value |
|---|---|
| Configuration Name | Google Calendar API |
| Grant Type | Authorization Code (PKCE) |
| Client ID | your-app.apps.googleusercontent.com |
| Client Secret | (your Google client secret - optional) |
| Authorization URL | https://accounts.google.com/o/oauth2/v2/auth?access_type=offline&prompt=consent |
| Token URL | https://oauth2.googleapis.com/token |
| Redirect URI | https://your-platform.com/oauth/callback |
| Scopes | https://www.googleapis.com/auth/calendar.readonly |
Common Google Calendar Scopes
https://www.googleapis.com/auth/calendar.readonly- Read-only access to calendarshttps://www.googleapis.com/auth/calendar- Full read/write access to calendarshttps://www.googleapis.com/auth/calendar.events.readonly- Read-only access to eventshttps://www.googleapis.com/auth/calendar.events- Full access to events
Step 5: Authorize the OAuth Configuration
After saving the configuration:
- Find your new OAuth configuration in the list
- Click the menu button (⋮) → PKCE Authorization
- A popup window will open, redirecting you to Google's consent screen
- Sign in with your Google account and grant the requested permissions
- After approval, the popup will close automatically
- A success notification will appear
Authorization Status
After successful authorization, the refresh token is stored securely in the database. You won't need to re-authorize unless the refresh token expires or is revoked.
Complete Example: Stripe API (Client Credentials)
For Stripe API, we use Client Credentials because: - Stripe uses API keys for authentication - No user consent is required
Configure in Nuvoca
| Field | Value |
|---|---|
| Configuration Name | Stripe API |
| Grant Type | Client Credentials |
| Client ID | sk_test_your_secret_key |
| Client Secret | (Stripe uses the secret key as both) |
| Token URL | https://api.stripe.com/v1/oauth/token |
| Scopes | (leave empty for Stripe) |
Stripe-Specific Setup
Stripe's OAuth flow is different. For API access, you typically use the API key directly. The Client Credentials flow is shown here for illustration - check Stripe's documentation for your specific use case.
Using OAuth in API Tools
Once OAuth credentials are configured, you can use them in API tools:
- Navigate to your agent's Tools page
- Click "Create Tool" → Select "HTTP API request"
- Fill in the API tool configuration:
- Tool name:
google_calendar_lookup - Execution description: "Use this when the caller asks about upcoming appointments or schedule."
- HTTP method:
GET - Request URL:
https://www.googleapis.com/calendar/v3/calendars/primary/events - Under Authentication, select your OAuth credential from the dropdown
- Configure query parameters if needed (e.g.,
timeMin,maxResults) - Save the tool
Managing OAuth Configurations
Testing OAuth Configuration
From the OAuth credentials list:
- Click the menu button (⋮) next to a configuration
- Select Test
- The platform will attempt to fetch a new access token
- Success indicates your configuration is working
For PKCE configurations, this tests the refresh token flow. If no refresh token exists, you'll need to authorize first.
Invalidating Cached Tokens
To force a new token fetch:
- Click the menu button (⋮) → Invalidate Token
- The cached access token is cleared
- Next API call will fetch a fresh token
Revoking Authorization
To clear authorization and require re-authorization:
- Click the menu button (⋮) → Revoke Credentials
- This clears:
- The refresh token from the database
- The cached access token
- Next token request will require re-authorization via the PKCE Authorization button
Editing OAuth Configuration
- Click the menu button (⋮) → Edit
- Modify the configuration as needed
- The cached token is automatically invalidated when you save
Deleting OAuth Configuration
- Click the menu button (⋮) → Delete
- Confirm the deletion
- All associated tokens are cleared
- Any API tools using this configuration will fail
Troubleshooting
Client Credentials Issues
| Issue | Symptom | Solution |
|---|---|---|
| Invalid Client | 401 Unauthorized, "invalid_client" | Verify Client ID and Secret are correct |
| Invalid Token URL | Connection error or 404 | Check the token endpoint URL for your provider |
| Missing Scopes | 403 Forbidden, "insufficient_permissions" | Add required scopes to the configuration |
Authorization Code + PKCE Issues
| Issue | Symptom | Solution |
|---|---|---|
| Redirect URI Mismatch | "redirect_uri_mismatch" error | Ensure redirect URI matches exactly in both Nuvoca and Google Cloud Console |
| Popup Blocked | Nothing happens when clicking Authorize | Allow popups for your platform in your browser |
| Authorization Expired | Token fetch fails after some time | Click "PKCE Authorization" to re-authorize |
| Invalid State | "Invalid state parameter" error | Try authorization again - this usually means the PKCE flow timed out |
Common OAuth Provider Settings
| Provider | Authorization URL | Token URL |
|---|---|---|
https://accounts.google.com/o/oauth2/v2/auth?access_type=offline&prompt=consent |
https://oauth2.googleapis.com/token |
|
| GitHub | https://github.com/login/oauth/authorize |
https://github.com/login/oauth/access_token |
| Microsoft | https://login.microsoftonline.com/common/oauth2/v2.0/authorize |
https://login.microsoftonline.com/common/oauth2/v2.0/token |
| Slack | https://slack.com/oauth/v2/authorize |
https://slack.com/api/oauth.v2.access |
Google-Specific Parameters
For Google OAuth, always include access_type=offline&prompt=consent in the authorization URL:
- access_type=offline - Ensures Google returns a refresh token for long-term access
- prompt=consent - Forces the consent screen to appear, guaranteeing a refresh token is returned
Without these parameters, Google only returns a short-lived access token (1 hour) and no refresh token, requiring re-authorization every hour.
Finding OAuth URLs
Your OAuth provider's documentation will list the authorization and token endpoints. Search for "[Provider] OAuth endpoints" or "[Provider] API authentication".
Security Best Practices
- Use PKCE when possible: Authorization Code + PKCE is more secure than traditional flows
- Limit scopes: Only request the minimum permissions needed
- Rotate secrets: Regularly update client secrets according to your security policy
- Monitor usage: Review OAuth credential usage and access patterns
- Revoke when not needed: Delete or revoke OAuth credentials that are no longer used
- Secure redirect URIs: Always use HTTPS for redirect URIs in production
- Keep client secrets secure: Never expose client secrets in client-side code or logs
Related Documentation
- Creating API Tools - How to create API tools that use OAuth
- Built-in Tools - System tools available to all agents