Launch your first voice agent
First launch
Follow this path to create a callback assistant, assign it to a real number, and complete a live test call. Keep the first version narrow and production-like.
By the end, a caller should reach the right assistant and leave a complete callback request.
This guide follows a narrow callback-assistant flow adapted for the English product docs.
By the end of this guide, you will have a Nuvoca Callback Assistant answering a real phone number, collecting the callback details, and passing a live test call.
Time estimate and prerequisites
Plan for 15 to 25 minutes. Before you start, make sure you can do all of the following in the workspace:
- Open Agents and create a new agent
- Open Routing and manage numbers
- Use a workspace that already has an available phone number, or one where your platform team can provide one
- Name the team or inbox that should receive the callback handoff once the flow is working
Recommended settings
Keep the first version narrow.
- Agent path:
Single Agent - Channel:
Voice - Recognition languages: start with one language only
- Greetings: write one short greeting per time window
- Greeting interruption: if Do not allow interruption is available, enable it for the greeting
- Model:
GPT-4o Mini - Temperature:
0.5 - Max completion tokens:
150to250 - Conversation history limit:
20
Do not add tools or a knowledge base until the callback flow itself works.
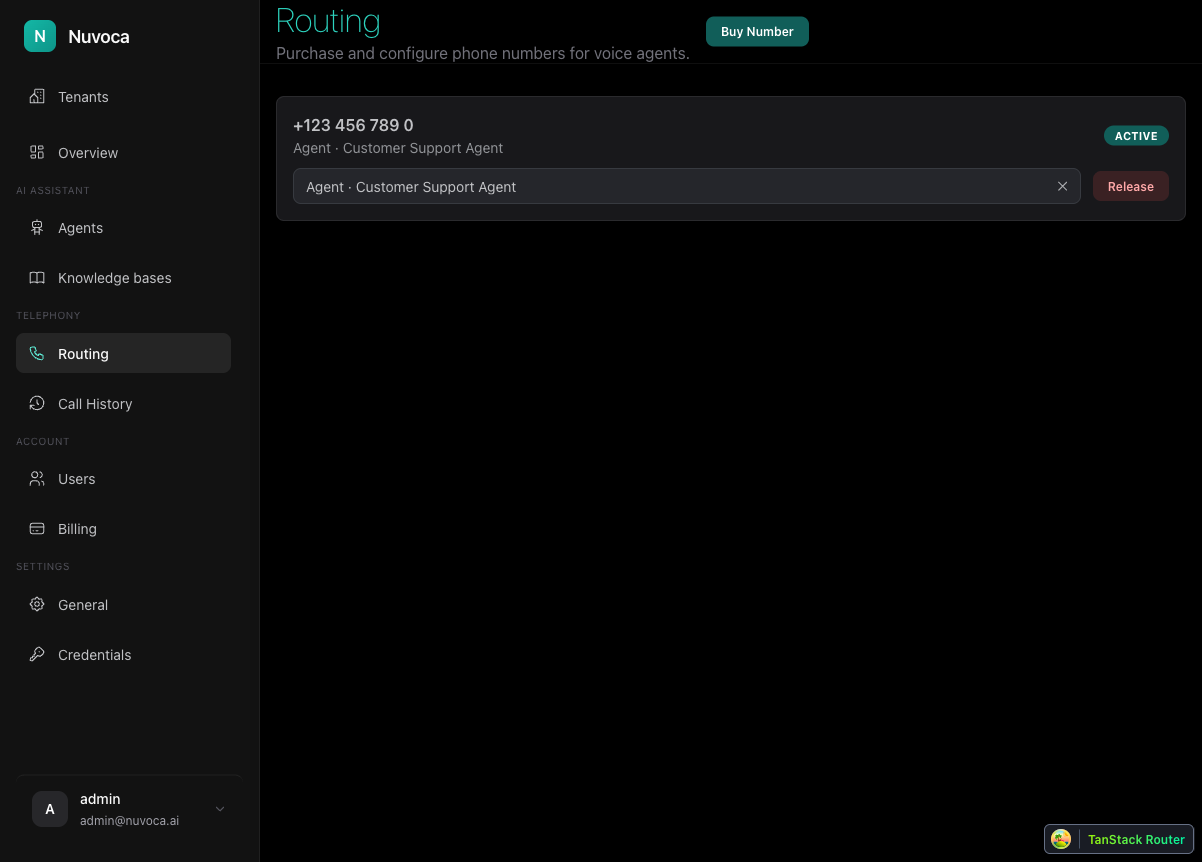
Step 1: Select an available phone number in Routing
Start with the phone number so you know which line this assistant is going to answer.
- Open Routing in the Telephony area.
- Find an unassigned or available number that should be used for this flow.
- Keep that number unassigned for the moment. You will connect it after the assistant is configured.
- If your workspace does not have a number yet, stop here and ask your platform team to provide one before continuing.
If you do not have number access or no usable number appears, stop here and fix telephony first. For the full routing workflow, see Telephony Setup.
Step 2: Create a Single Agent voice agent
Open Agents and click Create.
Use the simplest path that gives you one callable assistant:
- If the wizard asks you to choose between Single Agent and Agentic System, choose Single Agent
- For the assistant type or channel, choose Voice
- Do not turn this into a multi-agent setup on day one
The goal is one dependable callback assistant, not a full automation stack.
Step 3: Set identity and greetings
In the identity step, give the assistant a narrow role and a professional opening.
- Title: use an internal label like
Callback Assistant V1 - Agent Name: use the spoken name callers will hear, like
Ava - Persona: keep it short, for example
You are a friendly, professional callback assistant for our company. - Important Note: use this only for short-lived operating context, such as a holiday closure or delayed callbacks
- Morning / Afternoon / Evening greeting: write one clear greeting for each time window
A practical greeting looks like this:
Thanks for calling Acme. This is Ava, the Nuvoca callback assistant.
I can collect your details and arrange a callback from the team.
If Do not allow interruption is available for the greeting, enable it so callers hear the full introduction once before they answer.
Step 4: Configure speech recognition
In Speech, configure the assistant so it can capture callback details accurately.
- Start with one recognition language only
- If this line is mainly German-speaking, choose
German (Germany); otherwise choose the primary language your callers use - Keep silence settings close to the defaults unless you already know the assistant is cutting people off
- Add your company name, brand names, or unusual terms to the phrase list if the UI exposes one
Do not optimize for every edge case yet. The first goal is reliable capture of the caller name, company, reason, and callback number.
Step 5: Configure voice output
In Voice, choose a voice that sounds clear and trustworthy.
- Pick one voice that sounds professional, not theatrical
- Keep tempo and expressiveness moderate
- Avoid advanced voice tuning until the callback flow itself works
This is a production-like setup pass, not a branding exercise.
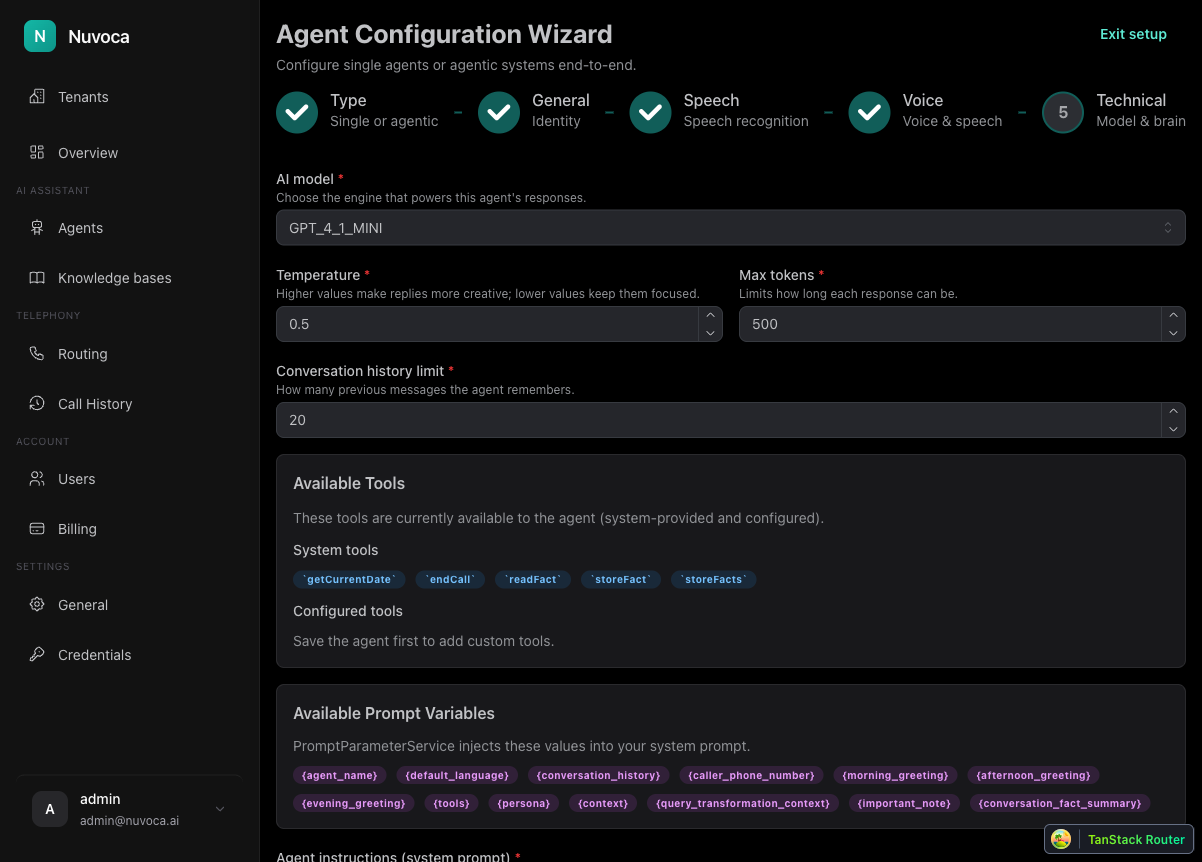
Step 6: Configure the brain in Technical
Open Technical and configure the callback logic there.
Set the core fields first:
- AI model:
GPT-4o Mini - Temperature:
0.5 - Max completion tokens:
150to250 - Conversation history limit:
20 - Agent instructions (system prompt): use a callback-assistant prompt with the required variables
Use this template as your first version:
## Role
You are {agent_name}, the digital callback assistant for our company.

## Context
Your job is to handle missed or overflow calls, collect the caller's details, and arrange a callback from the team.

## Conversation flow
- Greet the caller professionally.
- Ask for the caller's name.
- Ask for the company name.
- Ask for the reason for the call.
- Ask whether {caller_phone_number} is the best number for the callback.
- If the caller says no or the number is unavailable, ask for the best callback number.
- When all required details are collected, confirm that the team will call back and end the conversation politely.

## Error handling
- If an answer is unclear, ask a short clarifying question.
- If you do not know the answer to a company question, say so clearly and return to collecting the callback request.

## Rules
- Ask only one question at a time.
- Do not ask for the same fact twice unless the previous answer was unclear.
- Do not invent missing information.
- Do not change caller-provided values before handing them to a tool or a human teammate.
- Keep answers short and professional.

## Additional information
{important_note}

## Caller phone number
{caller_phone_number}

## Recent conversation
{conversation_history}
Two details are required for continuity and callback confirmation to work:
- Keep
{conversation_history}in the prompt - Keep
{caller_phone_number}in the prompt
Do not add {context} yet. Add a Knowledge Base section later only after a knowledge base exists and you want the assistant to answer from retrieved documents.
Step 7: Link the number to the agent
Go back to Routing and connect the number to the assistant.
- Find the selected number in the routing list
- Open Assign agent or flow
- Select your new callback assistant
- Confirm the route appears active
You should also be able to confirm the assignment from the Agents page in the Routing column.
Step 8: Place the first test call
Call the number yourself and verify the full callback flow:
- The call reaches the intended assistant
- The correct greeting plays
- The assistant asks for the caller name, company, and reason for the call
- The assistant asks whether the detected number can be used for the callback
- The caller can confirm or correct the callback number
- The assistant closes the call cleanly after collecting the details
If the call connects but the assistant feels stateless, check Conversation history limit in Technical and confirm the prompt still includes {conversation_history}.
Step 9: Add the Email Tool as the first next step
Once the callback assistant can complete a clean call, the next useful improvement is the Email Tool. That lets the assistant send the collected callback details to your team instead of keeping them inside the conversation only.
What to do next
- Go to Built-in Tools to add the Email Tool or conference forwarding
- Go to Telephony if you need more detail on number handling and live-call checks
- Go to Knowledge Base if the assistant should answer company or policy questions during the call
- Go to Voice Configuration after the callback flow itself is stable